


If you’ve been managing AdWords campaigns for a while, then you are likely familiar (to some degree) with the various settings which allow you to customise how your website is presented on SERPs. But a lot of managers have been content to settle for the default setup that Google recommends. Now I’m not pointing any fingers here, but a lot of these default settings are not necessarily in your best interest, and a few of them can end up costing you quite a lot of money if they aren’t properly controlled.
Of course, the default settings are not bad for every site, not even for most of them. Strictly speaking, it depends a lot on what kind of campaign you are running; and if you are new to AdWords, chances are that you are running a campaign that doesn’t need to take advantage of some of Google’s more expensive, default features. So familiarising yourself with these settings in a way that gears them to your own efforts will end up saving you a ton of money on unwanted features.
If you’re fairly new to AdWords and can’t afford to make any costly mistakes, then you definitely want to have a good look at your settings tab. A lot of the available options, you’ll notice have been marked as ‘advanced’, but if you just inspect them a little, you’ll find that they are actually fairly simple settings to understand and tweak, and you will get better, more appropriate results from them.
- The Search Network Campaign Settings

This is where you will determine the type of campaign you wish to run, and the type of campaign you choose will affect which settings become available. Your options here are ‘Search Network with Display Select’, ‘Search Network only’, ‘Display Network only’, ‘Shopping’ and ‘Online Video’. By default, Google sets the campaign to ‘Search Network with Display Select’, and for most standard websites, this selection is unnecessary and more costly.
Try working with ‘Search Network only’, it lets you make use of standard results based on people who are searching specifically for your product or service using various terms and keywords. For new campaigns this is a fairly good option because if left unchecked, the Display Network can end up getting fairly costly, especially when considering it might not be as relevant to your campaign as it seems.
If you’re more interested in building brand awareness then you won’t get what you want from the search network, and so the ‘Display Network’ is a much better option. With this type of campaign, you can display rich media advertising (text, mobile apps, images, or videos) with the help of the a software development company (if you are not savvy enough to create your own digital content). You can do this across millions of relevant websites at once, depending of course on how much your budget can sustain. It does this by matching your content up with keywords used in websites that have opted to be a part of the Google Display Network to spread your brand and products across a wider audience.
- Change your campaign subtype.
Just to the right of the bar that indicates the type of campaign you have chosen, will be options for the campaign subtype you want. These options will vary according to the type (mentioned above) that you have chosen.
For those that have followed our advice and selected ‘Search Network only’ as their option, the subtypes you see available should read ‘Standard’ and ‘All Features’. In this instance, the default setting chosen by Google is ‘Standard’. Standard gives you a simpler view of the available options, which limits your potential to customise your campaign and save money per click on unwanted features.
‘All features’, on the other hand, gives you a full listing of the various ways you can change things. If you want to take full advantage of what’s on offer in the settings menu, you’ll have to be a little bit brave and actually tinker with some of these. But don’t worry, tinkering with these settings isn’t as complicated as it sounds, and mistakes can be easily rectified by revisiting your settings so long as you keep an eye on what you end up paying per click. Let’s look now at the first of these options.
- Location options
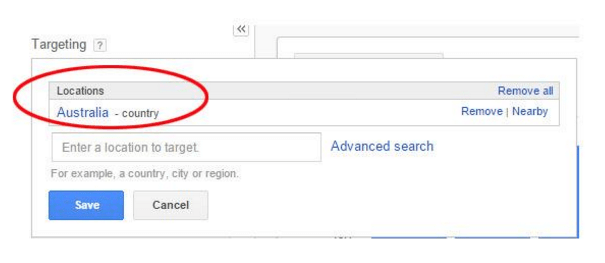
Just below your standard location settings is a minimised tab (by default) labelled ‘Location options (advanced). These options are not as advanced as their heading would lead you to believe but are in fact quite straightforward, and if you use them correctly can optimise who gets directed to your site based on how you want the traffic to flow… to a certain degree, saving you money on clicks that won’t be bringing your business any customers since they don’t stay anywhere near your location.
Controlling who gets directed to your site will have quite an impact on your budget so you need to take care to only target an audience that is feasible to your product or service’s delivery limitations. For instance, if you are running an AdWords campaign for a local locksmith in Nebo, then there is really no need to direct traffic to your site from people who stay in South Africa, the USA or any other location far outside of your business’s radius.
Campaigning on a global scale when you don’t have to will chew unnecessarily through your budget, so take your company’s abilities into consideration here and only target the people you want to. So above and beyond localising your standard location settings, take a look at the advanced settings as well.
With these advanced location options you can target or exclude factors from the following fields:
1.‘People who are in, searching for or show interest in your targeted location’ is, the first option; and also the default one. This has an all-encompassing target and so is only really suitable if you are marketing on a global scale. Remember that each click costs money, so if you don’t want to pay for those that come from the other side of the planet, then this isn’t for you. If you have an ecommerce site that needs to reach a global audience, then it probably is.
2. ‘People in your targeted location’. This is a good one for people who want to exclude clicks from anyone outside of their targeted location. So delivery services and local service or product providers who operate on a small scale would benefit (budget-wise) from this the most. The trouble is that this may also give away too much to your local competitors, but there is no reward without any risk.
3. ‘People searching for or showing interest in your targeted location’. This option excludes the people who are searching from your targeted location. Why would you want to do that? You might ask. Well if you are a hotel, guesthouse, or lodge, then what is the point in advertising to the locals? With this option you won’t pay for clicks from your local point, but will from all of the others. So if you are running a campaign that would preferably be marketing only to people in your area, this is clearly not the option for you.
Simply overlooking these so called ‘advanced options’ or being content with Google’s default setup could lead to more than a few costly mistakes that can wipe out organic traffic, punch holes in your budget, and have you bidding for things you don’t need. So take care that your settings are geared to your campaign’s needs, and don’t just take Google’s word for it.
There is a lot more to talk about with regards to these settings, but before you delve into that world, it is a good idea to cultivate a solid understanding of the tweaks you can apply to your AdWords campaigns. If you want to have a better understanding of how to reach the right customers with your campaign, then have a look at this really helpful video from Google, who far from wanting to take all of your money, want to give you and your clients the most appropriate services that they can.